
Why does underfloor heating cause tile cracking? Accordingly, here's the explanation
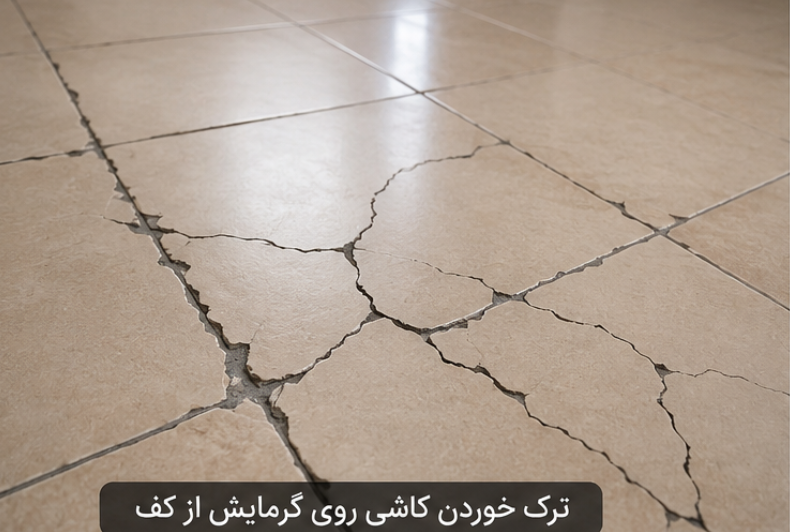
You have probably experienced this yourself, or at least heard about it from someone else. For example, someone excitedly installs an underfloor heating system and spends a good amount of money on it. However, the first winter they turn it on, their tiles start cracking one by one. Not just ordinary cracks — as if someone has walked across the entire floor with a hammer.
Therefore, the question is: how does underfloor heating, which was supposed to bring the ultimate comfort and pleasure, turn into a nightmare? Accordingly, in this article, I am going to answer exactly that question.
First, I will explain what characteristic of underfloor heating systems makes them incompatible with tiles. Then, I will discuss the three main reasons behind most cracking incidents. These reasons are: unsuitable adhesive, lack of expansion joints, and improper substrate preparation. Finally, I will tell you what you can do if you are currently facing this problem — without having to remove all the tiles.
So, if you don’t want the floor of your life to crack, stay with me until the end.
What is the best adhesive for underfloor heating, and why does it matter?
What is an expansion joint, and what role does it play in underfloor heating?
How does an expansion joint prevent tile cracking?
What is a cold or wet substrate, and why can it be dangerous?
What is the best adhesive for underfloor heating, and why does it matter? Accordingly, here's what you need to know
First, let’s be clear and straightforward about one thing. Underfloor heating systems are not inherently bad. However, the problem is that most people — and even some installers — forget a simple law of physics: heat expands everything.
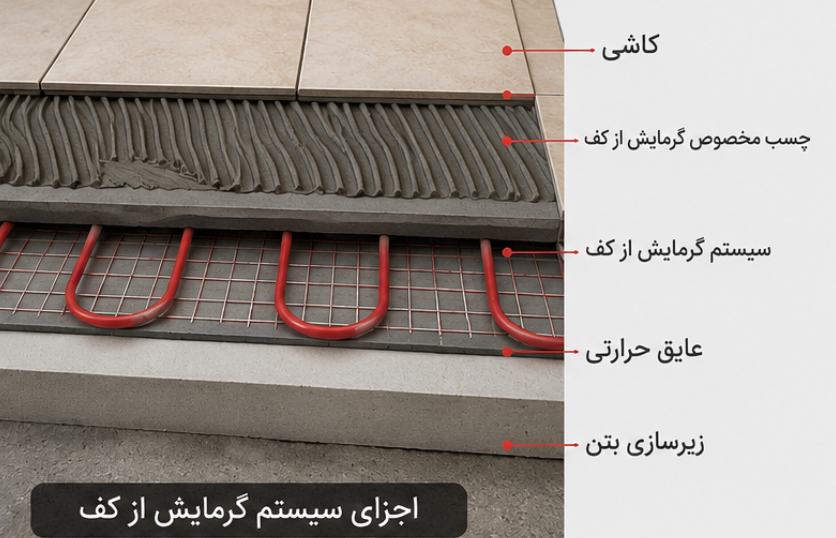
An underfloor heating system, whether water-based or electric, constantly raises and lowers the temperature of your floor. For example, when you wake up in the morning, the system turns on and the floor warms up. Then, by midday when the weather is warmer, the system shuts off and the floor cools down. At night, the same cycle repeats. As a result, the tiles, the adhesive, and even the concrete beneath your feet are constantly expanding and contracting.
Now consider a single tile. When it heats up, it expands slightly. When it cools down, it returns to its original size. This movement may only be a few tenths of a millimeter. However, when you lay hundreds of tiles side by side, those few tenths of a millimeter add up to several centimeters of movement. Therefore, this enormous force has to go somewhere.
Now compare this to a conventional floor
— one without heating. In that case, temperature fluctuations are much smaller. An ordinary tile might warm up and cool down by only a few degrees throughout the day. On the other hand, with underfloor heating, these fluctuations can reach 30 to 40 degrees Celsius. This means the thermal stress on your floor is roughly ten times greater than that on a conventional floor.
Now that you have been introduced to this hidden dragon, let’s move on to the three main culprits that turn this expansion and contraction into a disaster. Accordingly, why do tiles crack even when everything seemed to be done correctly?
What is an expansion joint, and what role does it play in underfloor heating? Accordingly, here's why it matters
Now, let’s move on to the first and most important killer of tiles: unsuitable adhesive.
Many people think that any adhesive labeled “antifreeze” or “exterior grade” is sufficient for underfloor heating. However, let me let you in on a secret.
Ordinary cement-based adhesives found in local stores are designed for a conventional floor without heating. They are hard, brittle, and inflexible. Now imagine applying this rigid adhesive beneath a tile that is constantly expanding and contracting. What happens? The adhesive cannot absorb this movement. As a result, it crumbles, turns to powder, or detaches from the concrete surface. The outcome is nothing but that hollow sound and those cracks you see on the tiles.
Therefore, let’s get to the main point.
In the Iranian market, three types of tile adhesive are most common: paste adhesive (ready-to-use), ordinary powder adhesive, and special porcelain powder adhesive. Let’s see which one is the smart choice for underfloor heating.
Paste adhesive performs well in wall tiling projects with small tiles. It is easy to work with and requires no mixing. However, for a floor with underfloor heating and large tiles, this type of adhesive does not have the capacity to withstand expansion and contraction forces. Paste adhesive is designed for applications where significant thermal stress does not exist. Therefore, it is not considered a suitable option for underfloor heating.
Ordinary powder adhesive is a very good choice for many tiling projects. Whether on walls or floors, these adhesives offer high bonding strength and perform excellently with standard tiles. They have only one drawback: their flexibility is limited. When used on an underfloor heating system, continuous temperature fluctuations can put pressure on the adhesive layer over time. Consequently, for this specific application, it is better to choose another option that is designed for the job.
Special porcelain powder adhesive — this is exactly what you are looking for.
These adhesives, usually white in color, are made with special polymer materials and a high percentage of flexible resins. As a result, they can easily withstand the temperature variations caused by underfloor heating.
For example, TN3000 Bidak tile adhesive:
This product, typically white in color, is manufactured with special polymer materials and a high percentage of flexible resins. Therefore, it can easily handle the temperature fluctuations generated by underfloor heating.
These adhesives are produced in two different grades: S1 and S2. The letter S stands for flexible. S1 adhesives have moderate flexibility and are suitable for normal temperature variations. If your underfloor heating system does not reach very high temperatures or the floor area is not very large, S1 adhesives may meet your needs. On the other hand, S2 adhesives offer the highest degree of flexibility and are designed for high-temperature underfloor heating systems or very large spaces. These adhesives can expand and contract by several millimeters without any damage — just like a soft cushion that absorbs the pressure from expansion and contraction, preventing it from being transferred to the tile.
In addition, special porcelain adhesives are designed to hold heavy, low-absorption tiles and provide excellent bonding strength. Accordingly, if you have an underfloor heating system, you should choose between S1 and S2 grade adhesives. Both are suitable for this application. However, if your floor temperature gets very high or you have a large area, it is better to go with the S2 grade.
Also, do not forget another very important point.
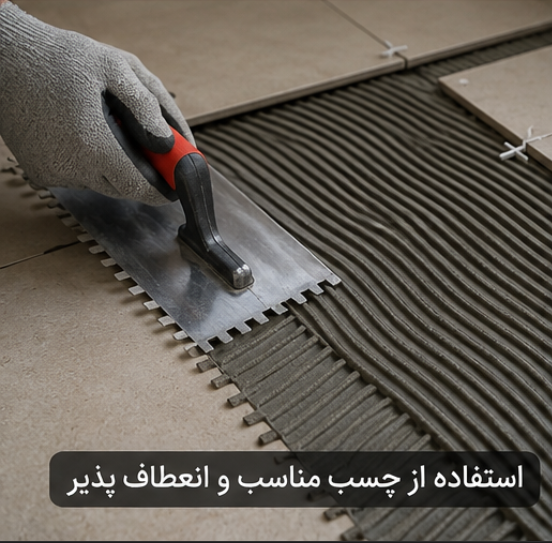
Adhesive for underfloor heating must be applied in a thicker layer. For conventional floors, the adhesive layer is about 3 to 5 millimeters thick. However, for underfloor heating systems, this thickness should be 8 to 15 millimeters. A thicker layer means more capacity to absorb thermal forces.
Now you already know what to look for. Therefore, let’s move on to the second killer — which may be even more important than unsuitable adhesive: the expansion joint. Unfortunately, this is something that most installers either forget or do not know how to execute properly.
How does an expansion joint prevent tile cracking? Accordingly, here's how it works
Now, let’s move on to the second killer. This killer is even more dangerous than unsuitable adhesive, because most installers either forget about it or think it is unimportant. I am talking about the lack of an expansion joint.
First, let’s understand what an expansion joint means. A large tiled floor is like a large sheet of paper. When you heat paper from one point, it wrinkles. The same happens with a tiled floor. When the underfloor heating system turns on, the entire surface wants to expand. However, the surrounding walls prevent it from doing so. What is the result? The tiles press against each other and have nowhere to go. Consequently, this pressure causes either the edges of the tiles to crumble or their centers to crack.
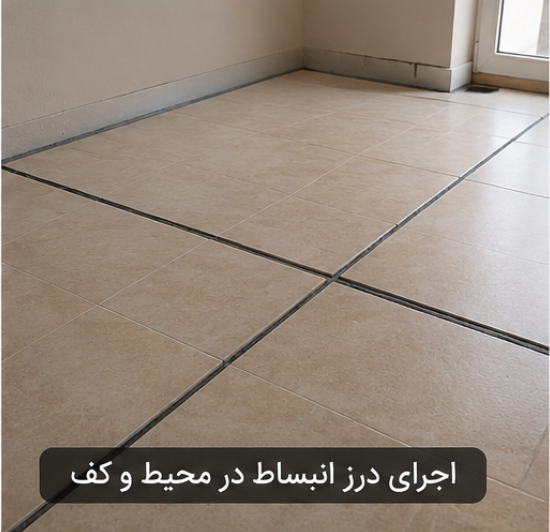
An expansion joint is essentially an empty gap without tiles, whose job is to absorb this pressure. These joints act like empty breathing spaces. When the tiles press against one another, these joints provide room to close up, and instead of the pressure transferring to the tiles, it is neutralized within this empty space.
Now, the important question is: where should these joints be created?
First rule:
You must have a perimeter joint all around the floor — specifically, where the tile meets the wall. The width of this joint should not be less than 8 to 10 millimeters. After tiling, this joint is filled with a soft, flexible material called silicone sealant. Be careful not to fill this joint with hard grout. Hard grout does exactly the same damage to the joint as it does to the tiles — it leaves no room for expansion, and the pressure returns to the tiles.
Second rule:
Even if you have placed joints all around, for large floors this is not enough. Specifically, any space where the length or width exceeds 8 meters must have another expansion joint created in the middle. Additionally, if your space is L-shaped or has columns, you must also place expansion joints around the columns and at the inner corners of the L.
Many installers say, “We stuck a soft foam strip around the wall — that’s enough.” However, this is a common mistake. Here’s why: that foam strip only exists during tiling. Days later, when you want to apply wall grout or install baseboards, you unintentionally fill that empty space with grout or baseboard adhesive. As a result, you have effectively destroyed the expansion joint. To prevent this from happening, when installing baseboards, you must maintain a gap of a few millimeters between the baseboard and the tile surface. This small gap allows the tiles to have enough room to expand when heated.
Therefore, remember: a floor with underfloor heating should never be installed as a single, seamless piece. That would be a guaranteed disaster. Every few meters, you must give your floor room to breathe.
Now, let’s move on to the third killer:
A cold or wet substrate — something that most people never even think about.

What is a cold or wet substrate, and why can it be dangerous? Accordingly, here's what you need to know
Now, let’s get to the third killer. This one works much more silently than the previous two. Accordingly, many people never even consider that the problem might be beneath the surface when their tiles crack. However, the reality is that a cold or wet substrate can destroy all your hard work.
The first problem: a wet or damp substrate.
For example, suppose the concrete beneath your floor is still not dry, and you have tiled over it. When you turn on the underfloor heating, the moisture in the substrate evaporates. Consequently, the water vapor has to go somewhere. It has no way out except to escape through the tile joints and the adhesive. As it does so, the water vapor puts pressure on the adhesive layer, which can detach the adhesive from the surface or create bubbles beneath the tile. Over time, these bubbles turn into empty cavities, leaving the tile with no support at that point. What is the result? With the slightest pressure, the tile cracks.
This is precisely why experts say that before starting tiling on an underfloor heating system, you must turn the system on for several days to remove all moisture from the substrate. Then, turn it off and let the floor cool down. After that, begin the tiling process.
The second problem: a cold substrate.
Many tiling projects are carried out in cold weather. However, if your substrate is cold and you install tiles on it and then turn on the heating, a tremendous temperature difference is created. The underlying layer is still cold, while the tile and adhesive layer are warming up. As a result, this temperature difference generates shear stress. In other words, the layers expand at different rates and pull against each other. The outcome, once again, is tile cracking.
The solution to this problem is simple. Therefore, if you are working in a cold season, heat the enclosed space for a few days before starting tiling so that the substrate reaches a temperature above 10 degrees Celsius. Then, proceed with the tiling.
Final note for this section:
Before you even open a single scoop of adhesive, make sure your substrate is dry and warm. If you have any doubts about these two factors, do not start at all. Instead, take a few days to bring the substrate to an ideal condition. This short waiting period will save you from a major disaster.
Conclusion: accordingly, embrace underfloor heating — but follow the principles
Conclusion: Underfloor heating is one of the best and most comfortable heating systems for modern homes. Accordingly, no one is saying you should not use it. However, the problem lies elsewhere. Specifically, the issue is that many people take on this work without understanding the technical principles, and as a result, the outcome is cracked tiles and frayed nerves.
In this article, we have examined the three main killers of tiles in underfloor heating systems. First, there was unsuitable adhesive. We saw that ordinary and paste adhesives are not designed for this application, and therefore, white powder adhesive with an S2 grade is the best option. Second, there was the expansion joint. We learned that the absence of these joints in large spaces and around walls forces the expansion pressure onto the tiles. Third, there was the cold and wet substrate. We learned that before any work begins, the substrate must be dried and warmed; otherwise, all efforts will be wasted.
Finally, if you are currently facing this problem, do not lose hope. Depending on the severity of the damage, you can either replace only the cracked tiles, inject liquid adhesive, or — in the worst case — demolish the entire floor and rebuild it from scratch. However, before starting over, be sure to find the root cause.
Therefore, remember: spending money once on quality materials and proper installation is far more economical than redoing the work and suffering the frustration. Accordingly, love underfloor heating — but treat it properly.